SAML authentication with Microsoft Entra ID
Setup guide
Zenskar supports single sign-on (SSO) via SAML 2.0, allowing organizations to authenticate users through their existing identity provider. This how-to guide will help you set up SAML in Zenskar using Microsoft Entra ID as the identity provider.
Step 1: Domain verification
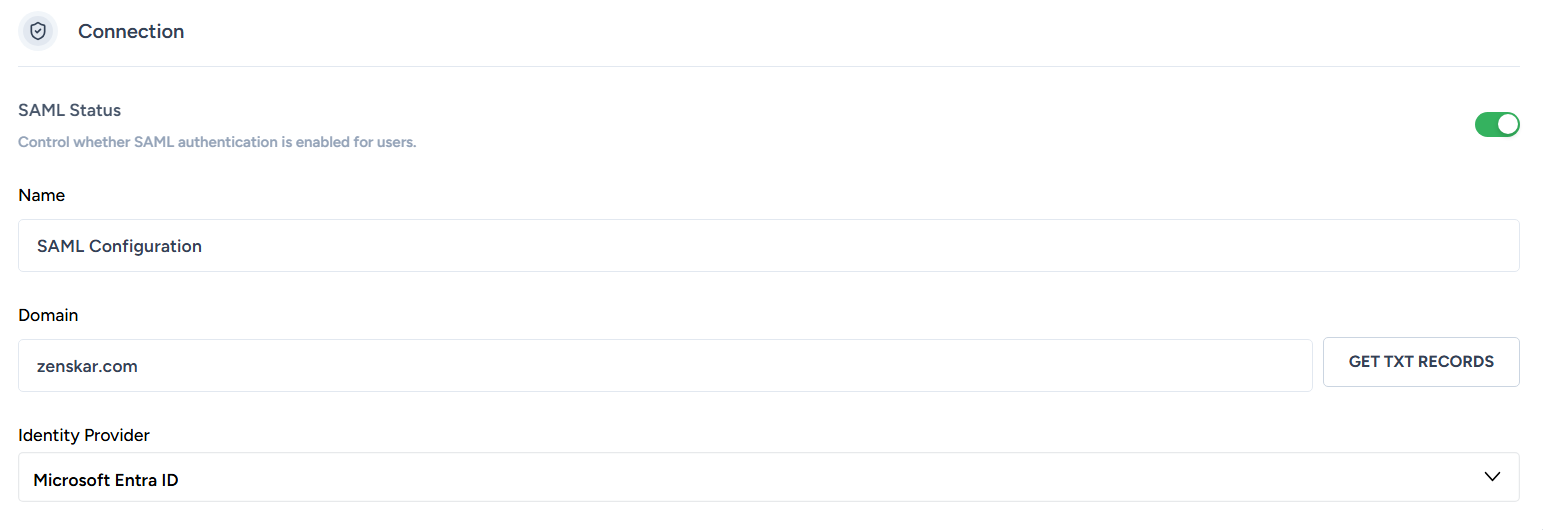
- In Zenskar, click on the drop-up menu at the bottom of the side panel > Settings > SAML tab.
- In the Connection section of the SAML tab, enter your domain (e.g., acme.com).
- Click on the GET TXT RECORDS button.
- Add the following
TXTrecord to your DNS:
| Host name | TXT value |
|---|---|
| zenskar-verify.acme.com | zenskar-verify=sample-verification-string |
- Under Identity Provider, select Microsoft Entra ID from the dropdown.
Step 2: Identity provider configuration
-
Log in to the Azure portal.
-
Go to Microsoft Entra ID > Applications > Enterprise Applications > + New Application.
-
Select Create your own application.
-
Name your application (e.g., "Zenskar SSO") and choose Integrate any other application you don't find in the gallery (non-gallery application).
-
After the app is created, go to Single Sign-On, choose SAML.
-
Copy values of the following fields from the Azure portal and paste into Zenskar:
| Source | Destination |
|---|---|
| Azure portal > Microsoft Entra ID > App registrations > [Your App] > Overview > Directory (tenant) ID | Zenskar > click on the drop-up menu at the bottom of the side panel > Settings > click on the SAML tab > Identity Provider Configuration section > Microsoft Entra Identifier |
| Azure portal > Microsoft Entra ID > App registrations > [Your App] > Endpoints > OAuth 2.0 authorization endpoint (v2) | Zenskar > click on the drop-up menu at the bottom of the side panel > Settings > click on the SAML tab > Identity Provider Configuration section > Login URL |
| Azure portal > Microsoft Entra ID > Enterprise applications > [Your App] > Single sign-on > SAML Certificates > Certificate (Base64) > Download | Zenskar > click on the drop-up menu at the bottom of the side panel > Settings > click on the SAML tab > Identity Provider Configuration section > Certificate |
NoteOpen the downloaded certificate file in a text editor. Copy the certificate, including the BEGIN CERTIFICATE header and the END CERTIFICATE footer.
- Assign users or groups who should have access.
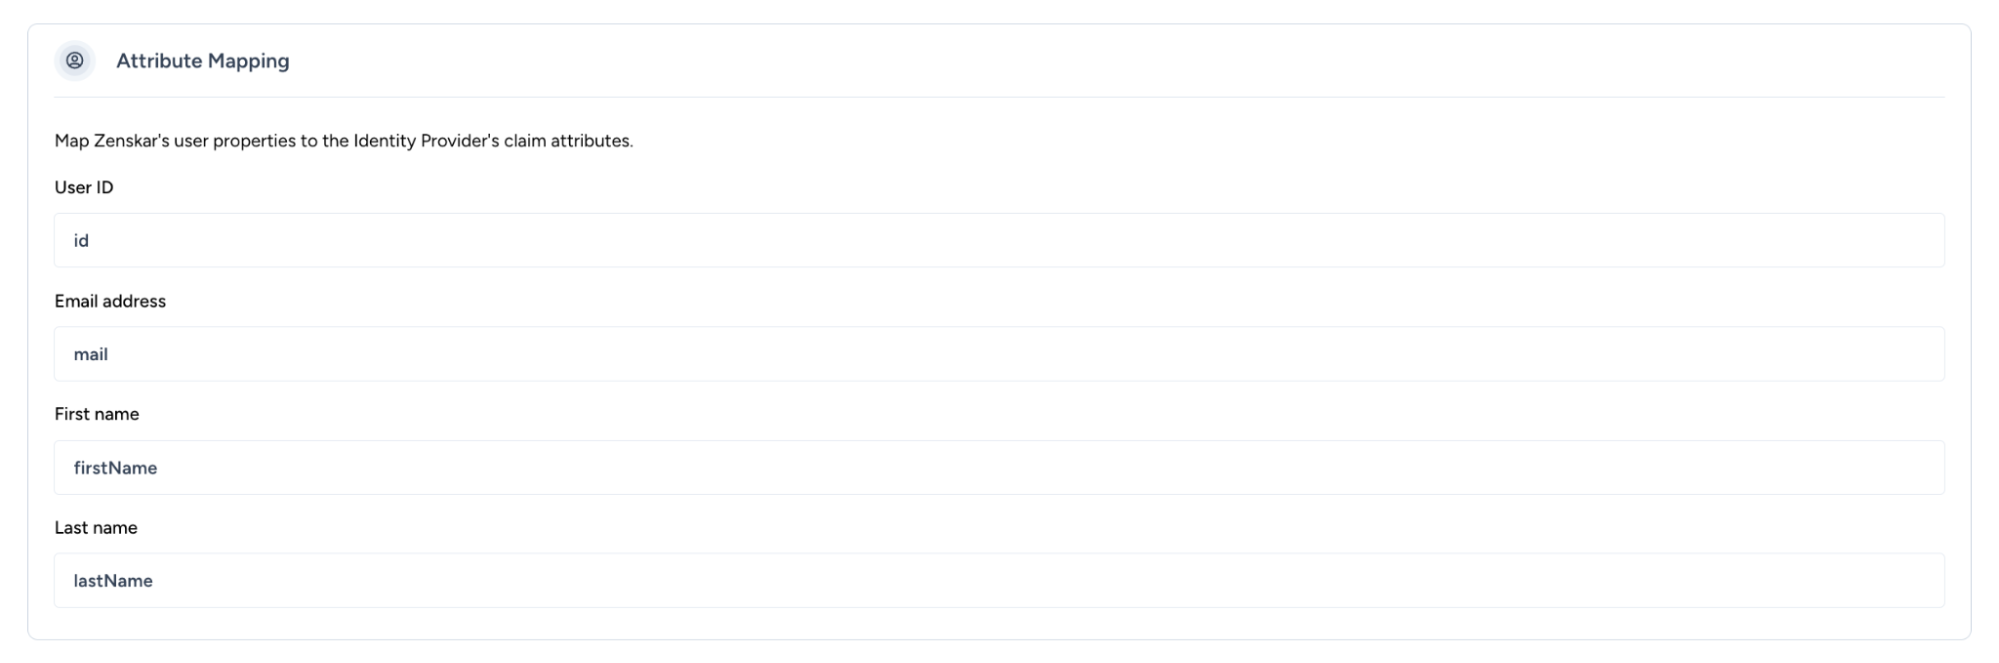
Step 3: Attribute mapping
Map Microsoft Entra SAML claims to Zenskar's internal user fields:
| Zenskar field | Microsoft Entra claim (common defaults) |
|---|---|
| User ID | user.objectid |
| Email address | user.mail |
| First name | user.givenname |
| Last name | user.surname |
🔐 Default SAML claims in Microsoft Entra ID
| Claim name | Namespace | Source attribute | Description |
|---|---|---|---|
http://schemas.xmlsoap.org/ws/2005/05/identity/claims/nameidentifier | Standard | user.userprincipalname or user.objectid | Unique identifier for the user (also used as NameID) |
http://schemas.xmlsoap.org/ws/2005/05/identity/claims/name | Standard | user.userprincipalname | User's sign-in name |
http://schemas.xmlsoap.org/ws/2005/05/identity/claims/givenname | Standard | user.givenname | User’s first name |
http://schemas.xmlsoap.org/ws/2005/05/identity/claims/surname | Standard | user.surname | User’s last name |
http://schemas.xmlsoap.org/ws/2005/05/identity/claims/emailaddress | Standard | user.mail | User's primary email address |
http://schemas.microsoft.com/ws/2008/06/identity/claims/role | Microsoft-specific | Directory roles or app roles | Populated if role-based access is configured |
http://schemas.microsoft.com/identity/claims/tenantid | Microsoft-specific | Tenant ID | Azure AD tenant GUID |
http://schemas.microsoft.com/identity/claims/objectidentifier | Microsoft-specific | user.objectid | Unique object ID of the user in Azure AD |
🛠️ You can customize or add more claims
To customize SAML claims for an enterprise application:
- Go to the Azure portal.
- Navigate to Microsoft Entra ID > Enterprise applications > [Your App] > Single sign-on > User Attributes & Claims.
- From this page, you can:
- Edit existing claims
- Add new claims (e.g.,
id,employeeid) - Use transformation functions such as:
Join– combine multiple valuesRegexReplace– perform pattern-based replacementsToLower/ToUpper– change casingExtractMailPrefix– get the part before@in an email address
NoteCustom claims are helpful when the service provider expects specific attribute names or formats that don't match Azure's defaults.
.
Step 4: Add Zenskar SAML configuration values to Microsoft Entra
- Copy values of the following fields from Zenskar and paste into the Azure portal:
| Source | Destination |
|---|---|
| Zenskar > click on the drop-up menu at the bottom of the side panel > Settings > click on the SAML tab > Zenskar SAML Configuration Values section > Entity ID | Azure portal > Microsoft Entra ID > Enterprise applications > [Your App] > Single sign-on > Basic SAML Configuration > click the Edit icon (🖉) in the top-right of the Basic SAML Configuration box > Identifier (Entity ID) |
| Zenskar > click on the drop-up menu at the bottom of the side panel > Settings > click on the SAML tab > Zenskar SAML Configuration Values section > ACS URL | Azure portal > Microsoft Entra ID > Enterprise applications > [Your App] > Single sign-on > Basic SAML Configuration > click the Edit icon (🖉) in the top-right of the Basic SAML Configuration box > Reply URL (Assertion Consumer Service URL) |
- Save the configuration.
Step 5: Test SSO login
- Ensure the user exists in both Entra and Zenskar.
- Go to Zenksar app.
- Select Sign-in using SSO.
- You’ll be redirected to your IdP login screen.
- On success, you’ll be redirected back to the Zenskar dashboard.
Please feel free to reach out to [email protected] for any additional questions while you are going through the setup process.
Updated 5 months ago